If you own a MacBook Pro from a specific era, you might be familiar with the Touch Bar—that sleek, dynamic strip replacing your traditional function keys. It was designed to adapt to your workflow, offering context-sensitive controls and quick access to tools. But what happens when this innovative feature misbehaves, leaving you wondering if it's your Mac or the feature itself? Navigating identifying specific MacBook Pro models with Touch Bar issues and getting them back on track is a common challenge, but one you can absolutely overcome with the right knowledge.
This guide will walk you through everything from identifying your Touch Bar-equipped model to a comprehensive, step-by-step troubleshooting process. We'll cut through the noise, offering actionable advice to resolve common Touch Bar glitches, freezing, or unresponsiveness, empowering you to tackle these frustrating issues head-on.
At a Glance: Your Touch Bar Troubleshooting Toolkit
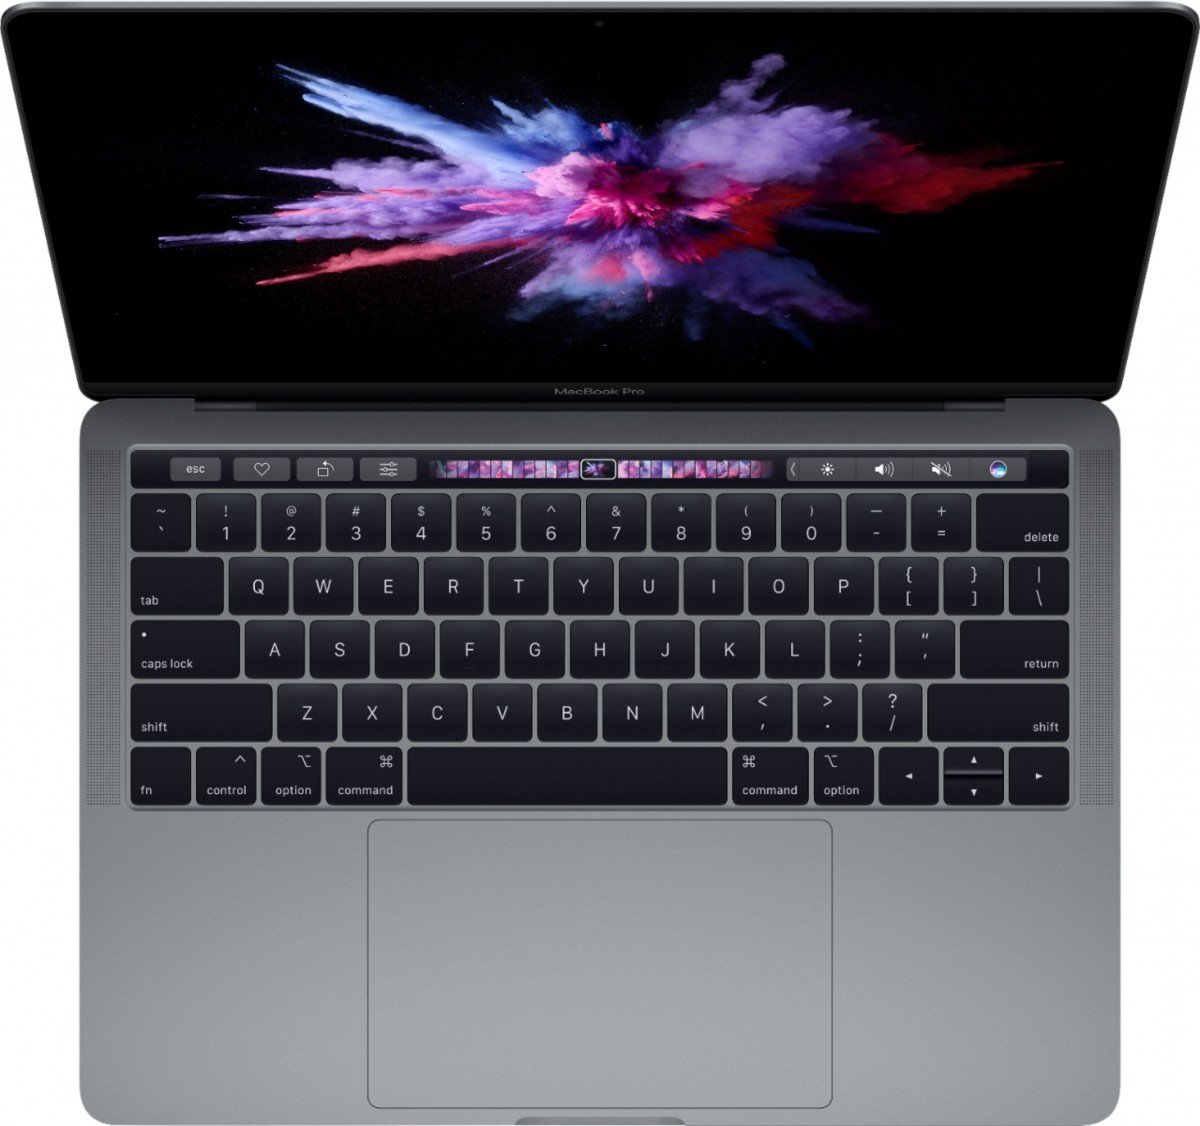
- Pinpoint Your Model: Touch Bar features specific MacBook Pro models from late 2016 to late 2020 (13-inch), late 2016 to 2019 (15-inch), and late 2019 (16-inch).
- Start Simple: A basic MacBook restart often resolves minor software hiccups.
- Stay Updated: Keep macOS current to patch bugs and enhance stability.
- Check Third-Party Apps: Conflicting applications are a frequent source of trouble.
- Reset the Server: Force-quitting the "Touch Bar Server" process can revive an unresponsive strip.
- Advanced Resets: SMC and NVRAM resets address deeper system-level communication issues.
- Inspect for Damage: Physical damage or liquid exposure almost always requires professional repair.
- Know When to Call Apple: Don't hesitate to seek professional help for persistent hardware problems or if DIY fixes fail.
The Story of the Touch Bar: Innovation, Utility, and Its Place in Mac History
The Touch Bar arrived on the scene in late 2016, a bold reimagining of the traditional function key row. Apple's vision was to provide a dynamic interface that adapted to the task at hand, whether you were editing photos, composing an email, or simply adjusting system volume. It quickly became a defining feature for a specific generation of MacBook Pro users.
Functionally, the Touch Bar offers a surprising range of capabilities: quick access to system controls like brightness and Siri, app-specific features (think brushes in Photoshop or timeline scrubbing in video editors), emoji suggestions, and even custom shortcuts you can personalize. You can drag and drop icons like Do Not Disturb, Screenshot, or a Brightness Slider directly onto the Control Strip via System Settings (or System Preferences) > Keyboard > Customize Control Strip.
However, despite its potential, the Touch Bar also faced its share of criticism. Concerns ranged from increased battery consumption to a perceived lack of universal adoption by third-party developers, who sometimes found it challenging to justify the development cost for a Pro-only feature. These factors contributed to its eventual phase-out from most new MacBook Pro models starting in 2021, though it reportedly made a brief return in some configurations in 2022. For our purposes, understanding its specific presence in earlier models is key to troubleshooting.
Pinpointing Your MacBook Pro: Models with a Touch Bar
Before you dive into diagnostics, it's crucial to confirm that your MacBook Pro actually features a Touch Bar and to understand its specific model year. This helps narrow down potential causes and ensures you're applying the correct troubleshooting steps.
The Touch Bar was exclusively featured on MacBook Pro models during these periods:
- MacBook Pro 13-inch: Late 2016 through 2020 models (excluding the 2016-2017 entry-level 13-inch models which retained function keys). This includes the Four Thunderbolt 3 Port variants.
- MacBook Pro 15-inch: Late 2016 through 2019 models.
- MacBook Pro 16-inch: The late 2019 model.
How to Identify Your Specific MacBook Pro Model:
The easiest and most reliable way to identify your Mac's model and year is directly through macOS:
- Click the Apple menu () in the top-left corner of your screen.
- Select "About This Mac."
A window will appear displaying your MacBook Pro's model name (e.g., "MacBook Pro (13-inch, 2020, Four Thunderbolt 3 Ports)") and its serial number. This information is vital for understanding compatibility and warranty status, should you need professional assistance. Knowing your exact model year helps confirm if your Mac is indeed one of the generations equipped with the Touch Bar and, therefore, susceptible to its specific issues.
Understanding Common Touch Bar Troubles
When your Touch Bar isn't behaving, it's usually manifesting in a few key ways. Recognizing these symptoms helps you deduce the root cause and apply the most effective solution.
The most common issues you might encounter include:
- Unresponsiveness: Taps and swipes don't register, or the Touch Bar appears "frozen."
- Missing Buttons: Expected app-specific controls or even basic system controls vanish.
- Glitches or Flickering: The display on the Touch Bar might flicker, show artifacts, or display incorrect information.
- Freezing: The Touch Bar gets stuck on a particular display or set of controls and won't change.
These issues generally fall into two categories:
Software-Related Problems
The Touch Bar, while a physical component, is heavily reliant on software for its functionality. Many common problems stem from:
- App-Specific Bugs: A particular application might have a bug that causes its Touch Bar integration to fail or conflict with the system.
- Outdated macOS: Bugs in the operating system itself, often resolved with subsequent updates.
- Third-Party App Conflicts: Sometimes, non-Apple applications, especially utilities or background processes, can interfere with how macOS manages the Touch Bar.
Hardware-Related Problems
More serious issues can indicate a physical problem with the Touch Bar unit or its connection to the motherboard. These are typically harder to fix yourself:
- Physical Damage: Cracks, dents, or impacts to the area around the Touch Bar.
- Liquid Spills: Even a small amount of liquid can wreak havoc on sensitive electronics.
- Overheating: Prolonged high temperatures can damage internal components over time.
- Loose Connections: The ribbon cable connecting the Touch Bar to the logic board might become dislodged or damaged.
Identifying whether the problem is software or hardware is the first critical step in troubleshooting. Start with the simplest software fixes and progressively move to more involved diagnostics.
Your Step-by-Step Guide to Troubleshooting Touch Bar Issues
Don't let a misbehaving Touch Bar disrupt your workflow. Most issues can be resolved with a methodical approach, starting with the easiest fixes and gradually progressing to more advanced solutions.
1. Start Simple: The Classic Restart
It sounds almost too simple, but a full MacBook restart is often a magical cure for minor software glitches. It clears temporary files, resets active processes, and can resolve conflicts that arose during a long uptime.
- How to do it: Click the Apple menu () > Restart... Confirm your choice when prompted.
- Why it helps: Many Touch Bar issues are transient software hiccups. A restart gives your entire system a fresh slate, often resolving stuck processes or minor memory errors that affect the Touch Bar.
2. Keep Your macOS Current: Update is Key
Apple regularly releases macOS updates that include bug fixes, security patches, and performance improvements. An outdated operating system can be a common culprit for unexpected behavior, including Touch Bar issues.
- How to do it: Go to System Settings (or System Preferences) > General > Software Update. If an update is available, follow the on-screen instructions to download and install it.
- Why it helps: Apple actively addresses known issues with its hardware and software through updates. A specific Touch Bar bug might have already been identified and fixed in a newer macOS version.
3. Third-Party App Conflicts: The Usual Suspects
Some third-party applications or utilities, especially those that aim to customize system behavior, can inadvertently interfere with the Touch Bar's normal operation.
- How to do it: Think about any new applications or updates you've installed recently, especially utilities that modify system functions or offer Touch Bar customization. Try temporarily uninstalling or disabling them one by one to see if the Touch Bar returns to normal. Pay particular attention to apps that run in the background.
- Why it helps: Isolation is key. If the problem only occurs when a specific app is running, or appeared after installing one, that app is likely the source of the conflict.
4. A Quick Fix: Resetting the Touch Bar Server
The Touch Bar runs on a dedicated background process called "Touch Bar Server." If this process crashes or becomes unresponsive, the Touch Bar will follow suit. You can force-restart it without rebooting your entire Mac.
- How to do it:
- Open Activity Monitor (you can find it in Applications > Utilities, or by searching with Spotlight Command + Space).
- In the search bar at the top right, type "Touch Bar server."
- Select the "Touch Bar server" process from the list.
- Click the "X" button in the toolbar (the stop sign icon) to quit the process.
- When prompted, choose "Force Quit."
- The Touch Bar server will automatically restart within a few seconds, hopefully resolving its issues.
- Why it helps: This method specifically targets the software component responsible for the Touch Bar's functionality, giving it a fresh start without interrupting your other work.
5. Deeper Dive: Resetting Your Mac's SMC (System Management Controller)
The SMC is responsible for low-level functions on Intel-based Macs (which all Touch Bar models are), including power management, battery charging, fan control, and, critically, how the Touch Bar interacts with the motherboard. Resetting it can resolve issues related to these connections.
For MacBook Pro models with the T2 Security Chip (Late 2018 and later, including the 16-inch late 2019):
- Shut down your MacBook Pro.
- Press and hold the Control (left side of keyboard) + Option (left side of keyboard) + Shift (right side of keyboard) keys for 7 seconds.
- While still holding those three keys, press and hold the power button as well for another 7 seconds.
- Release all four keys, then wait a few seconds.
- Press the power button to turn on your Mac.
For MacBook Pro models without the T2 Security Chip (Late 2016 - Mid 2018 13-inch and 15-inch): - Shut down your MacBook Pro.
- Press and hold the Shift (left side of keyboard) + Control (left side of keyboard) + Option (left side of keyboard) keys.
- While holding these three keys, press and hold the power button at the same time.
- Hold all four keys for 10 seconds.
- Release all keys, then press the power button to turn on your Mac.
- Why it helps: An SMC reset can fix power-related anomalies or communication glitches between the Touch Bar hardware and the rest of the system.
6. When All Else Fails (Software): Resetting NVRAM
NVRAM (non-volatile random-access memory) stores certain system settings, like sound volume, display resolution, startup disk selection, and recent kernel panic information, to allow for quick access. Resetting it can sometimes resolve unusual behavior, especially after a macOS update.
- How to do it:
- Shut down your MacBook Pro.
- Turn on your Mac and immediately press and hold the Option + Command (⌘) + P + R keys.
- Keep holding these keys for about 20 seconds. Your Mac might appear to restart, or you might hear the startup chime a second time. Release the keys after the second startup sound or after the Apple logo appears and disappears for the second time.
- Why it helps: Resetting NVRAM clears and restores certain cached settings that might be corrupted and causing conflicts with the Touch Bar's operation.
7. Advanced Diagnostics: Recovery Mode
If deep software corruption is suspected, booting into Recovery Mode allows you to reinstall macOS, repair your disk, or even restore from a backup. While not a direct Touch Bar fix, a fresh macOS install can resolve underlying OS issues that manifest through the Touch Bar.
- How to do it (Intel-based Macs):
- Shut down your MacBook Pro.
- Power on your Mac, then immediately press and hold Command (⌘) + R keys.
- Keep holding until the Apple logo or a spinning globe appears.
- Release the keys when the Utilities window appears. From here, you can select "Reinstall macOS."
- Why it helps: Reinstalling macOS can often fix stubborn software problems by replacing corrupted system files without erasing your personal data (though a backup is always recommended).
8. The Hardware Hurdle: Inspecting for Physical Damage
If none of the software solutions have worked, it's time to consider hardware. Carefully inspect your MacBook Pro, particularly the area around the Touch Bar and keyboard.
- What to look for:
- Cracks or Dents: Visible signs of impact.
- Liquid Stains: Any residue, stickiness, or discoloration suggesting a spill. Even minor liquid exposure can cause intermittent issues or complete failure.
- Overheating signs: While less visible, prolonged overheating can degrade internal components.
- When it's beyond DIY: Unlike software issues, hardware damage generally requires specialized tools and expertise. If you suspect physical damage or liquid exposure, attempting DIY repairs could worsen the problem or void your warranty. Beyond simple software glitches, sometimes the Touch Bar can exhibit more persistent or visual issues, such as constant flickering. If you're encountering such a problem, you might find specific steps to troubleshoot Touch Bar flickering in our dedicated guide, though such issues often point to hardware.
Prevention is Your Best Defense
While you can't prevent every potential issue, adopting a few best practices can significantly reduce the likelihood of encountering Touch Bar problems.
- Regular macOS Updates: Make it a habit to install macOS updates as soon as they are released. These updates often contain critical bug fixes and performance enhancements that ensure all hardware, including the Touch Bar, operates smoothly.
- Mind Your Third-Party Apps: Be selective about the applications you install, especially utilities that promise to optimize or customize your system. Always download software from trusted sources and, if you encounter issues, consider uninstalling recently added apps to check for conflicts.
- Protect Against Physical Damage: Treat your MacBook Pro with care. Avoid eating or drinking near it to prevent liquid spills. Use a protective case or sleeve when transporting it, and be mindful of where you place it to prevent accidental impacts or excessive heat exposure. Overheating can put strain on all internal components, including the Touch Bar's sensitive electronics.
When to Call in the Pros: Apple Support & Authorized Service
You've tried everything. You've rebooted, updated, reset, and inspected, but your Touch Bar remains stubbornly unresponsive or exhibits a serious hardware fault. This is the point where it's time to seek professional help.
- Persistent Software Failure: If you've diligently followed all the troubleshooting steps, including SMC and NVRAM resets and even a macOS reinstall, but the Touch Bar still isn't working, it strongly suggests an underlying hardware problem.
- Obvious Hardware Damage: Cracks, liquid damage, severe impacts, or a completely blank Touch Bar screen that never illuminates are clear indicators of hardware failure. These issues are almost impossible to fix at home without specialized tools and parts.
- Flickering or Visual Artifacts: While our guide on troubleshooting Touch Bar flickering provides some initial checks, persistent or severe flickering is often a sign of a failing display component within the Touch Bar itself or a loose connection that requires expert attention.
- Warranty Considerations: If your MacBook Pro is still under Apple's limited warranty or you have AppleCare+, getting professional service is often the most cost-effective solution. Attempting your own hardware repairs can void your warranty.
Contact Apple Support directly or schedule an appointment at an Apple Store or an Apple Authorized Service Provider. They have the diagnostic tools and expertise to accurately identify the problem and perform the necessary repairs safely and effectively.
Your MacBook Pro, Reclaimed
A malfunctioning Touch Bar can be a major inconvenience, transforming a sleek, interactive tool into a frustrating blank strip. But as we've explored, identifying specific MacBook Pro models with Touch Bar issues and systematically working through troubleshooting steps can resolve a surprising number of these problems.
By understanding which models feature the Touch Bar, distinguishing between software and hardware culprits, and applying a methodical approach to fixes—from simple restarts to deeper system resets—you empower yourself to get your Mac back to its full functionality. And remember, for those persistent hardware challenges, Apple's experts are there to ensure your beloved MacBook Pro continues to serve you well.